How to Blowout Hair at Home Like a Salon Pro: The Complete Expert Guide
Lip Store.euShare
Achieving a salon-quality blowout at home is no longer reserved for the professionally trained — it is entirely within reach when you understand the right techniques, use the right tools, and follow a precise, structured process. Whether you are looking to perfect your everyday styling routine or replicate the polished, high-shine finish you get in the salon chair, this guide gives you everything you need to blowout hair at home with professional results, every time.
From sectioning strategy and tension techniques to heat settings and finishing steps, mastering the at-home blowout is a skill that pays dividends every single day. Once you know the method, the results speak for themselves.
Why the At-Home Blowout Is a Game-Changer
The professional blowout is one of the most universally requested salon services — and one of the most frequently attempted at home with disappointing results. The difference between a flat, frizzy home blowout and a smooth, voluminous salon finish almost never comes down to the quality of the dryer. It comes down to technique.
When you understand the mechanics of the blowout — how airflow direction, tension, sectioning, and heat application interact — everything changes. The result is not just smoother hair. It is hair with body, shine, and a finish that holds for days. And it takes significantly less time than most people expect.
A great at-home blowout also extends the results of professional treatments, reduces your reliance on heat styling on other days, and keeps your hair healthier over time by minimizing repeated exposure to uncontrolled heat.
What You Need Before You Start
The quality of your blowout is determined before you even switch on the dryer. Preparation is everything — and that means starting with the right products and the right tools.
Here is what you need for a professional at-home blowout:
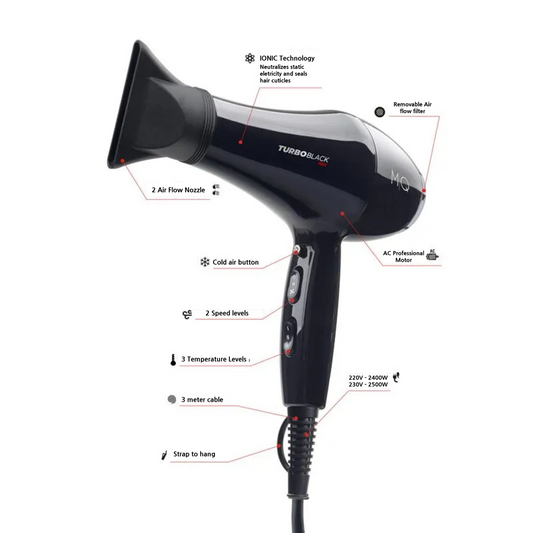
- A high-quality hair dryer with at least 1800 watts, a concentrator nozzle, and multiple heat and speed settings
- A round brush sized to your hair length — smaller barrels for short hair and defined curl, larger barrels for long hair and soft volume
- Sectioning clips to divide the hair cleanly and work methodically
- A heat protectant applied to damp hair before any heat is introduced
- A smoothing or blowout cream to reduce frizz, add slip, and enhance shine throughout the drying process
- A lightweight finishing serum or oil applied to dry hair at the end for polish and shine
Investing in professional-grade tools is the single most impactful upgrade you can make to your at-home blowout routine. A quality concentrator nozzle alone transforms airflow precision and dramatically improves results.
The Step-by-Step At-Home Blowout Technique
Follow this structured sequence for a salon-quality blowout every time. Consistency in technique is what separates a polished finish from a frustrating one.
- Shampoo and condition correctly: Use a volumizing or smoothing shampoo suited to your hair type. Apply conditioner from mid-lengths to ends only — never at the roots — to avoid weighing down the hair before you even begin styling
- Remove excess water: Gently squeeze — never rub — the hair with a microfiber towel or a soft cotton t-shirt to remove excess water. The hair should be damp, not dripping. Rubbing creates frizz and disrupts the cuticle before styling begins
- Apply heat protectant and styling products: Work a heat protectant evenly through damp hair from roots to ends. Follow with a blowout cream or smoothing lotion, distributing it through the mid-lengths and ends where frizz is most likely to form
- Rough dry to 70–80%: Before using the round brush, rough dry the hair with your fingers or a paddle brush to remove most of the moisture. Keep the dryer moving and the nozzle pointed downward along the hair shaft to smooth the cuticle as you go
- Section the hair: Divide the hair into four to six clean sections using clips — starting from the nape and working upward. Working in smaller sections gives you more control, more tension, and significantly smoother results
- Blowout each section with the round brush: Place the round brush underneath each section, apply tension, and follow closely with the dryer nozzle — always directing airflow downward along the hair shaft. Roll the brush smoothly toward the ends, rotating inward or outward depending on your desired finish
- Cool each section before releasing: After drying each section, roll the brush to the ends and hold in place while switching the dryer to the cool shot. This sets the style, locks in smoothness, and dramatically extends the hold
- Finish with a serum or oil: Once all sections are complete and the hair is fully dry, apply a small amount of finishing serum or lightweight oil to the palms and smooth over the hair for shine and frizz control
Key Techniques That Make the Difference
The difference between a passable at-home blowout and a genuinely professional result comes down to a handful of techniques that most people overlook. These are the details that salon professionals apply instinctively — and that you can start using immediately.
The most impactful techniques for a salon-quality at-home blowout are:
- Airflow direction: Always keep the nozzle pointing downward along the hair shaft, never against the cuticle. Downward airflow smooths the cuticle and creates shine; upward airflow causes frizz
- Tension: The more controlled tension you apply with the round brush, the smoother and more polished the result. Hold the section taut as you follow with the dryer
- Heat management: Use high heat to dry, then switch to medium or low heat for the final pass before the cool shot. Lower heat on the final pass protects the hair and creates a more refined finish
- The cool shot: This is the step that most people skip — and the step that makes the most difference for hold and smoothness. Never skip it
- Section size: Thicker sections take longer to dry and result in less control. Smaller, cleaner sections require more time but produce consistently superior results
Heat Protection: The Non-Negotiable Step
No at-home blowout technique is complete without a serious commitment to heat protection. Every time heat is applied to the hair without adequate protection, the cuticle is damaged, moisture is lost, and the long-term quality of the hair declines. The evidence is clear: heat protection is not optional, and understanding exactly what it does and why it matters is essential for anyone who blow dries regularly.
If you want to understand the full science behind heat damage and why professional-grade protection is non-negotiable for healthy styling results, the complete breakdown is available in this detailed analysis on whether heat protection is truly necessary for your hair. It is required reading for anyone who uses heat styling tools regularly.
Building a Professional Hair Routine Around Your Blowout
The at-home blowout does not exist in isolation — it is one element of a complete professional hair care routine. The condition of your hair before you style it determines how well it responds to the blowout technique, how long the results last, and how much heat you need to apply to achieve the finish you want.
Hair that is properly nourished, balanced in moisture and protein, and protected from daily environmental stress blows out faster, holds its shape longer, and requires less heat to achieve a polished result. If you want to understand how to structure a complete professional-level routine around your styling habits, the full framework is available in this comprehensive guide on how to build a professional hair routine at home.
How to Make Your Blowout Last Longer
A well-executed at-home blowout should last between two and four days with the right aftercare. Extending the results is not complicated — it simply requires a few deliberate habits that protect the finish you have created.
- Sleep on a silk or satin pillowcase to minimize friction and preserve the smooth finish overnight
- Avoid touching the hair excessively throughout the day — oils from the hands accelerate the breakdown of the style
- Use dry shampoo at the roots on day two or three to absorb oil and refresh volume without disturbing the rest of the blowout
- Keep a lightweight smoothing serum close at hand to tame any sections that begin to revert before the next full blowout
- Avoid high humidity environments where possible, particularly in the hours immediately after styling
Achieving Smooth, Shiny Hair Beyond the Blowout
The at-home blowout is a powerful styling technique, but maximum smoothness and shine require more than great technique alone. The condition of the hair beneath the styling — its porosity, cuticle integrity, and moisture balance — determines the ceiling of what any blowout can achieve.
For a comprehensive professional strategy for achieving and maintaining genuinely smooth, high-shine hair as a permanent result — not just a styling effect — the complete evidence-based framework is available in this expert guide on how to make your hair smooth and shiny.
Frequently Asked Questions
How long does an at-home blowout take?
For most hair lengths and densities, a complete at-home blowout using the sectioning technique takes between 30 and 60 minutes. Fine, shorter hair can be completed in as little as 20 to 25 minutes. Thick, long hair may take closer to 60 to 75 minutes. The investment in time decreases significantly as the technique becomes more practiced and efficient.
What is the correct heat setting for a blowout?
For most hair types, high heat is used during the rough drying phase, followed by medium heat during the round brush section work, and finished with the cool shot to set each section. Fine or damaged hair should avoid the highest heat setting and use medium heat throughout, with careful attention to how quickly the hair dries under tension — faster drying indicates lower porosity and better cuticle condition.
Can I blowout hair at home without a round brush?
A paddle brush or a vented brush can be used for a smoother, straighter blowout, but the volume, bend, and body that define the classic salon blowout are achieved specifically with a round brush. If the goal is maximum smoothness and some degree of lift at the roots, a round brush is the correct tool. A paddle brush works well for a sleeker, flatter finish on straight or near-straight hair.
How often should I blowout my hair at home?
Most hair types respond well to blowouts two to three times per week when proper heat protection is used consistently and the hair is maintained with a nourishing routine between sessions. Daily blowouts without adequate protection and conditioning can cause cumulative heat damage over time. Extending the blowout with dry shampoo and protective styling between sessions reduces the total heat exposure while maintaining the look.
Why does my at-home blowout not last as long as the salon version?
The most common reason home blowouts fade faster than salon versions is insufficient drying — the hair is styled before it is fully dry, which means it reverts more quickly when it encounters humidity or moisture. The second most common cause is skipping the cool shot, which is what sets the style and locks in the shape. Ensuring the hair is completely dry before releasing each section and consistently using the cool shot closes this gap significantly.